Windows Hello on openSUSE: Face Login with Howdy and an IR Camera
This post is also available in ID
series: linux-tips · 1/1▾ view
The Story
The laptop I use every day dual-boots Windows and openSUSE Leap 16.1. On Windows, logging in only takes a look at the camera through Windows Hello. But as soon as I switch to openSUSE, I’m back to typing my password, including every time I run sudo. That made me curious: can Linux also log in with your face, just like Windows? The answer is yes, with Howdy.
In this post I want to share the story and the steps I took to set up Howdy on openSUSE until it finally worked. Now sudo, the KDE lock screen, and the SDDM login screen can all be unlocked with my face, and the IR light blinks exactly like it does on Windows. But it turned out the road wasn’t as simple as “install Howdy, done”. There was an IR emitter that refused to turn on, a camera that hung, a tool that claimed success when it hadn’t succeeded, and SELinux quietly blocking the login screen.
I’ll also tell you about the dead ends I hit along the way, because that’s exactly where I learned the most. Okay, let’s get started.
Getting to Know the IR Camera
The first thing we need to know is that Windows Hello needs an infrared (IR) camera. On my laptop, the RGB camera and the IR camera turned out to live in the same USB module, a Luxvisions (30c9:011a). That module shows up as four video nodes, as in the table below:
| Node | Contents |
|---|---|
/dev/video0 | Regular RGB camera (MJPG, up to 1080p) |
/dev/video1 | RGB metadata |
/dev/video2 | IR camera (GREY 8-bit, 640x360) |
/dev/video3 | IR metadata |
To find out which node is the IR camera, we can run v4l2-ctl --list-formats-ext on each node. The node with the GREY format is the IR camera. And because the /dev/videoN number can change after a reboot, it’s better to use a stable path, namely /dev/v4l/by-path/...-1.2-video-index0.
This is where the first problem showed up right away. The frames from the IR camera were almost completely black, with an average brightness of about 3 out of 255. That means the IR light, or emitter, wasn’t turning on. On Windows, the driver is responsible for turning the emitter on, while on Linux nothing does it.
Dead End: linux-enable-ir-emitter
The tool most often recommended for this problem is linux-enable-ir-emitter. The way it works, the tool tests the camera one by one, then asks us whether the emitter is blinking or not. Unfortunately, on my camera the process didn’t go smoothly, and I ran into a few problems:
- The camera hung. During the first tests, control
unit 4 / selector 2failed to reset, and thenselector 3made the camera stop responding entirely. The only way to recover was a full shutdown, not just a restart. The fix is to mark that control asdisablein the tool’s config file, shut down, and try again. - The preview window didn’t show up. The tool opens a GTK window, but
sudodoesn’t pass on access to the display. So we need to run it withsudo env DISPLAY=$DISPLAY XAUTHORITY=$XAUTHORITY .... On top of that, the Y/N answer has to be pressed in the preview window, not in the terminal. - “Success”, I saw the IR blinking, but it wasn’t. After trying a dozen or so controls, the tool concluded that
unit 7 / selector 9was the answer. Later it turned out to be a false positive, because changing that control had no effect at all on frame brightness.
The Key: Windows Hello’s Own Switch
After hitting a dead end with that trial and error, I tried looking directly at the camera’s USB descriptor with lsusb -v. It turned out the key was right there. The IR camera has an extension unit with GUID 0f3f95dc-2632-4c4e-92c9-a04782f43bc8, which is the Microsoft Camera Extension Unit (MSXU). This is the standard interface used by Windows Hello. On my camera, that unit is number 7, and selector 6 is the FACE_AUTHENTICATION control.
This control holds 9 bytes, with an initial value of [1, 3, 1, 0, ...]. The third byte is the currently active mode:
1= normal mode, emitter off2= authentication mode, IR turns on alternately (bright and dark frames take turns), exactly the Windows Hello pattern
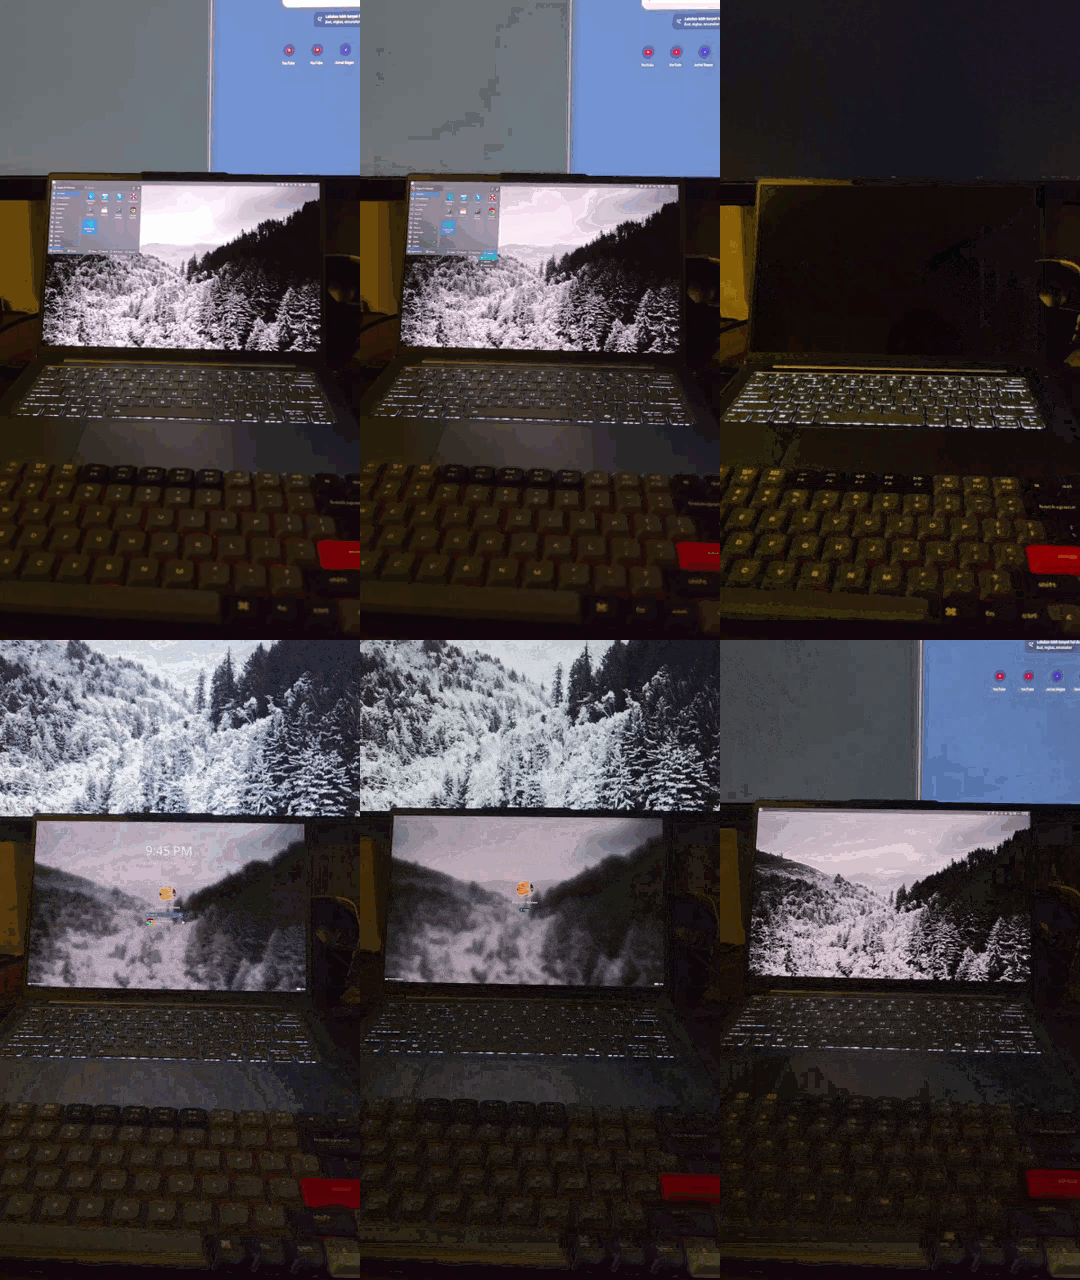
Actually, linux-enable-ir-emitter had already tried the value 2 on this control, but it did so while the camera was streaming. This mode can only be changed while the camera is not streaming. As soon as I switched it to mode 2 with the UVCIOC_CTRL_QUERY ioctl before opening the camera, the frame brightness immediately alternated between about 42 and 6.6. That means the emitter was blinking.
But there was still one more trap: the camera resets the mode back to 1 every time streaming stops. So changing it just once at boot is useless. The Windows driver does it every time the camera is opened, and that’s also what we need to do on Linux.
The solution was a small patch to Howdy’s recorders/video_capture.py. Right before the camera is opened, Howdy reads the FACE_AUTHENTICATION value, changes the third byte to 2, and writes it back. The patch is enabled through a new config option, ir_face_auth = true.
The result is pretty clear. Before the patch, the face in the IR frame looked dark and Howdy’s face detector failed to recognize it. After the patch, the face is lit up by the IR light and gets detected right away, on the third frame.
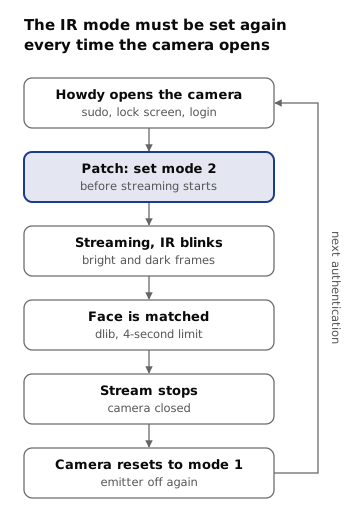
From the diagram above we can see that, because the camera always goes back to mode 1 every time it’s closed, the patch has to switch it to mode 2 again on every authentication.
Installing Howdy on openSUSE
Okay, next we move on to installing Howdy. Howdy isn’t in the official Leap repos yet, but all of its dependencies are, including python313-dlib and python313-opencv. So here I built it from source (Howdy 3.0.0) with meson:
meson setup build --prefix=/usr --sysconfdir=/etc --libdir=lib64 \
  -Dpam_dir=/usr/lib64/security -Dpython_path=/usr/bin/python3
ninja -C build && sudo ninja -C build install
Then the three dlib face models need to be downloaded separately into /usr/share/dlib-data/. After that, in /etc/howdy/config.ini we set device_path (the IR camera’s by-path path), frame_width = 640, frame_height = 360, and ir_face_auth = true. One thing to watch out for: ninja install will overwrite this config, so every time you reinstall, all of those settings need to be filled in again.
For PAM, openSUSE keeps its default files in /usr/lib/pam.d/. The cleaner way is to copy the file into /etc/pam.d/, then add the following line to the copy:
auth sufficient pam_howdy.so
I added this line to three files: sudo, kde (lock screen), and sddm (login screen). With sufficient, if your face isn’t recognized, PAM will still ask for your password as usual. My advice: while editing PAM, keep one sudo -i terminal open as an emergency exit, so you don’t get locked out of your own laptop.
Last Game: SELinux on the Login Screen
Once tested, sudo and the lock screen worked right away, but on the SDDM login screen the IR light didn’t even turn on. It turned out the difference was SELinux, which on Leap 16 is active in enforcing mode by default. sudo and the lock screen run as my user (unconfined), while SDDM’s authentication process runs in the confined xdm_t domain.
Interestingly, this denial doesn’t show up in journalctl, but in /var/log/audit/audit.log:
avc: denied { map } for comm="python3" path="/dev/video2"
  scontext=system_u:system_r:xdm_t tcontext=system_u:object_r:v4l_device_t
From the log above we can see that SDDM is allowed to open the camera, but isn’t allowed to mmap its buffer. Rather than turning SELinux off, I wrote a two-line CIL module and installed it with sudo semodule -i howdy_sddm.cil:
(allow xdm_t v4l_device_t (chr_file (map)))
(dontaudit xdm_t lib_t (dir (write add_name)))
The second line only silences logs about Python failing to write __pycache__, which is harmless. Once the module was installed, logging in to SDDM with my face worked right away, and SELinux stayed in enforcing mode.
Results and Trade-offs
Now sudo, the lock screen, and login can all be unlocked with my face in just a matter of seconds. If my face isn’t recognized within 4 seconds, everything falls back to asking for the password. And when accessed over SSH, Howdy is skipped automatically.
But of course there are trade-offs:
- Security below Windows Hello. Howdy relies only on the IR camera, without a certified anti-spoofing model. Treat it as a convenience, not a replacement for a strong password.
sudowithout typing. Any program that callssudowhile I’m sitting in front of the laptop gets approved right away. The blinking IR light is the only sign.- KWallet still asks for the password after logging in with your face, because the wallet needs the real password to decrypt its contents.
Conclusion
From this journey, there are a few lessons I took away:
- Read the hardware descriptor before brute-forcing.
lsusb -vshowed the MSXU right away, and that’s where the answer came from. Before that, about 30 minutes of trial and error only produced a false positive. - Measure, don’t trust a tool’s claims. Average frame brightness was the most honest measuring tool in this whole process.
- If something works in the terminal but not on the login screen, suspect SELinux. Look in
audit.log, not the journal. - Be careful with
sudo tar -C /.
The Howdy patch, the SELinux module, the XU diagnostic tool, and the full setup steps are in my GitHub repo bagaswibowo25/howdy-setup-suse.
I hope this little story helps anyone who wants to try logging in with their face on Linux, especially openSUSE. See you in the next post, and if you have any criticism, suggestions, or feedback, feel free to reach me through the contact page. Thank you.