Effortless Kubernetes Delivery with Zuul CI
First published on Medium ·
series: kubernetes-in-practice · 2/3▾ view

There are lots of open source CI/CD tools out there. Most of CI tools that I know is possibly triggering build by manual trigger, event trigger, or scheduled trigger. But I haven’t found a CI tool that can ensure that code that is pushed will always be tested, if it doesn’t pass it never will.
And I found this concept https://gating.dev/
Every change is built and tested or it doesn’t merge
Project gating have some advantage rather than manually trigger build. And the implementation is suitable to ensure that every change is thoroughly tested before it is merged into our main repository code. Based on that curiosity, then found this CI tool that has standout features for its project gating capability.
But it also has its drawbacks, like its a bit tricky if you want to rebuild the existing one.
Zuul CI is part of OpenInfra project https://openinfra.dev/projects/. One of the opensource foundation that focusing on development of open infrastructure.
Key Features
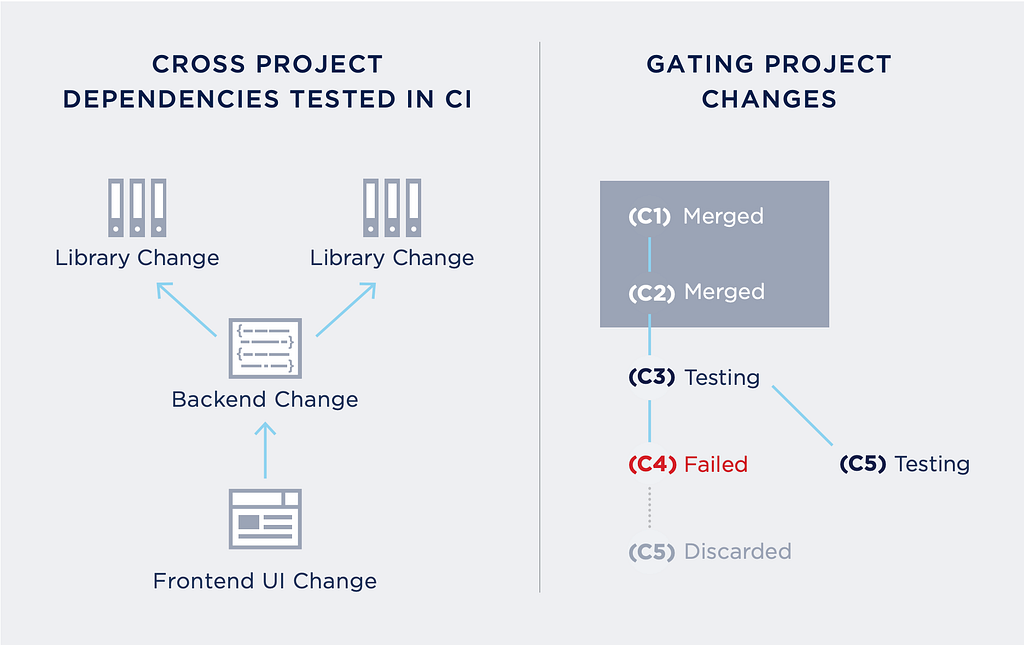
One of the standout features of Zuul CI is its project gating capability. This ensures that only changes that pass all tests are merged. To put it simply — stop merging broken code!
Zuul CI runs the CI/CD using Ansible. With Ansible makes Zuul CI highly customizable and flexible in defining and running jobs. And you can use the same Ansible playbooks to deploy your system and run your tests.
It is also have shared defined Ansible for Zuul on this, then you not require to start it from zero https://opendev.org/zuul/zuul-jobs/src/branch/master.
Then it support cross-repository dependencies, which allows us testing changes across multiple repositories. Multi-system gating (infrastructure
to apps, multi-project, multi-cloud).
Integrating Zuul with Kubernetes
Nodepool is a system for managing test node resources. It supports launching single-use test nodes from cloud providers as well as managing access to pre-defined pre-existing nodes. In this case I want to use Kubernetes as the nodepool providers.
providers:
  - name: k3s
    driver: kubernetes
    context: default
    pools:
      - name: main
        labels:
          - name: pod-python
            type: pod
            image: docker.io/python
          - name: pod-k8s-util
            type: pod
            image: docker.io/bagas25/k8s-util:latest
          - name: pod-dind
            type: pod
            spec:
              containers:
                - name: pod-dind
                  securityContext:
                    privileged: true
                  image: docker.io/bagas25/dind:latest
So to use kubernetes as the nodepool, you need to configure it through providers configuration section.
Simply you can create labels for your pool and put your Pod specification inside the labels. Then your builds can run on those node.
The important things to integrate with Zuul is you need to provide cluster access to Zuul. It is require to add cluster config on Zuul machine.
Or optionally you can deploy the Zuul inside your K8s cluster. Some option available is using Zuul helm-chart or Zuul Kubernetes Operator.
Connecting to Repository
Zuul support integration to common repositories, like GitHub, GitLab, Gerrit. For GitHub, you need to add the connection first by creating GitHub app integration and configure it on Zuul configuration
zuul.conf

[connection "zuullab"]
driver=github
webhook_token=<token>
app_id=<app_id>
app_key=/etc/zuul/github.pem
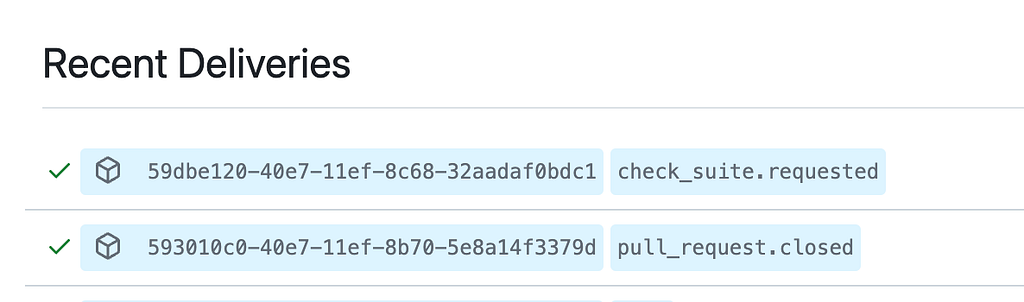
After successfully integrate to GitHub, make sure it can connect to GitHub. You can check it out on your App Integration settings.
Then, last you need to add the source on your Zuul tenant configuration. This sections, you can select which repository that will set as the project on Zuul.
main.yaml

- tenant:
    name: zuul-lab
    source:
      zuullab:
        config-projects:
          - bagaswibowo25/zuul-config:
              load-branch: main
        untrusted-projects:
          - bagaswibowo25/sample-flask-app
          - bagaswibowo25/flask-charts
Setup the Projects
After connecting to the repository, you need to define the workflow of your projects.
- project:
    name: ^.*$
    check:
      jobs: []
    gate:
      jobs: []

- project:
    name: zuul-config
    check:
      jobs:
        - noop
    gate:
      jobs:
        - noop
On this project settings, allows you to define the workflow. In this case I’m using two pipeline which check and gate.
Other pipeline option also available, like post, deploy, and promote.
The check pipeline is the first line of defense. So when a developer submits a change, Zuul CI immediately runs a series of preliminary tests on it.
The primary goal here is to quickly identify any obvious issues and provide immediate feedback to the developer. This helps in catching errors early in the development process.
Once a change passes the check pipeline, it enters the gate pipeline. Only changes that pass all tests in the gate pipeline are merged into the main branch. This ensures that the main branch remains stable and reliable.
Setup Application Project on Zuul
In this example case, I created simple Python flask application, that serve web server. This objective integration to Zuul is to do testing when the pull-request is made, and then build the container image for that application, so it can run as a container.
So what we need to do to create the CI pipeline to this project? We required to create project pipeline, it contain the list of job to run the builds. Then we also require create a job on Zuul config file. It defines the CI workflow for the project.
Here is the sample configuration of the project:
- job:
    name: test-flask-app
    run: playbooks/test-flask-app.yaml
    provides: test

- job:
    name: create-docker-container
    run: playbooks/create-container.yaml
    requires: test
    group-vars:
      dind:
        image:
          repository: bagas25/flask-app
          tag: v2
    secrets:
      - name: docker_auth
        secret: docker-auth
    nodeset:
      nodes:
        - name: pod-dind
          label: pod-dind
      groups:
        - name: dind
          nodes:
            - pod-dind

- project:
    check:
      jobs:
        - test-flask-app
    gate:
      jobs:
        - create-docker-container
The project section is defining the pipeline, what we want to do on the check and gate process. And on job section we define the build process which will run the Ansible playbook during the build.
To pass the variable on Ansible task, we can define the variable through the group-vars.
And we can provide specific node to run the build, if not defined it will use default node on the base configuration settings.
So the directory structure is more or less like this:
├── .zuul.yaml
├── app.py
├── Dockerfile
├── requirements.txt
├── playbooks/
│   ├── create-container.yaml
│   ├── test-flask-app.yaml
│   ├── roles/
│       ├── push-image/
│       ├── setup-container/
│       └── test-flask/
Zuul will automatically read the config file from .zuul.yaml or zuul.d/ directory.
One of interesting in this case is during building the container image, it will push the image to container registry. To connect to container registry we need to authenticate to the registry.
Zuul support encryption, it very useful when you need to pass the credential on the Ansible tasks. So we can safely store the sensitive variable to the repository. For more details you can read on Zuul documentation.
To apply the secret, you need to create a section on Zuul project setting.
- secret:
    name: docker-auth
    data:
      password: !encrypted/pkcs1-oaep
        - er1UXNOD3OqtsRJaP0Wvaqiqx0ZY2zzRt6V9vqIsRaz1R5C4/AEtIad/DERZHwk3Nk+KV
And to pass the secret as the variable, you need to add the secret on job configuration section.
Setup Deployment Project on Zuul
After the application is packaged as container image, next we need to create deployment to deploy the application to Kubernetes cluster. In this case I created helm-chart.
By using helm-chart it will make easier to deploy your apps to Kubernetes. It package your application that comply to Kubernetes component in one chart.
├── .zuul.yaml
├── Chart.yaml
├── values.yaml
├── playbooks/
│   ├── deploy-chart.yaml
│   ├── helm-validation.yaml
│   ├── roles/
│       ├── helm-check/
│       ├── helm-install/
│       └── helm-upgrade/
├── templates/
The project setting on this deployment project, it also run check and gate. The check pipeline will validate the helm-chart and for gate pipeline is a job to install or upgrade our application on Kubernetes.
- job:
    name: helm-validation
    run: playbooks/helm-validation.yaml
    nodeset:
      nodes:
        - name: pod-k8s-util
          label: pod-k8s-util

- job:
    name: deploy-helm-chart
    run: playbooks/deploy-chart.yaml
    group-vars:
      k8s:
        namespace: myapp
        chart_name: flask-web
        values:
          image:
            repository: bagas25/flask-app
            tag: v2
    nodeset:
      nodes:
        - name: pod-k8s-util
          label: pod-k8s-util
      groups:
        - name: k8s
          nodes:
            - pod-k8s-util

- project:
    check:
      jobs:
        - helm-validation
    gate:
      jobs:
        - deploy-helm-chart
Trigger Builds
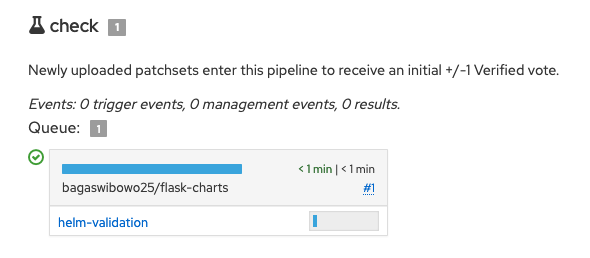
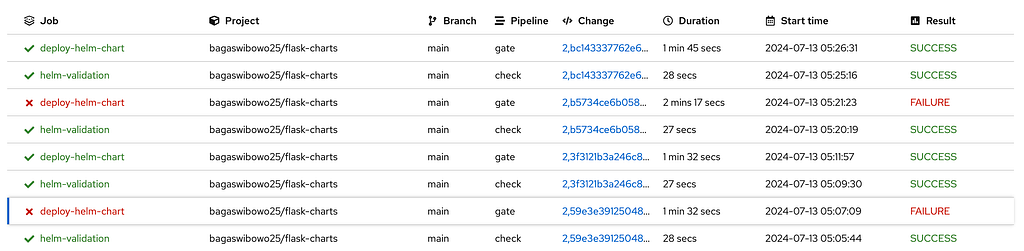
So after you made a change on branch, we can monitor on Zuul web status. On that web, we can monitor list of build on each pipeline.
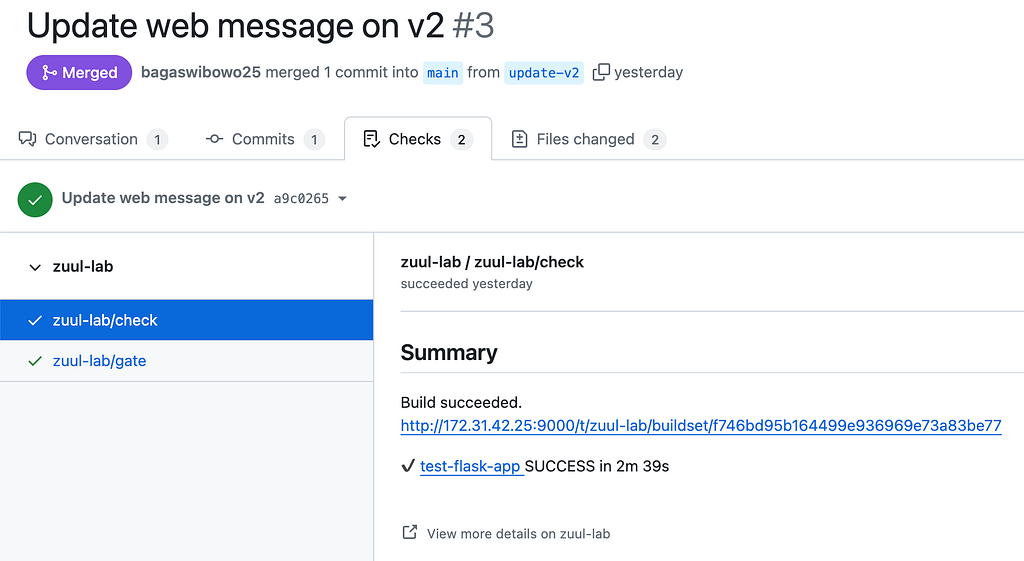
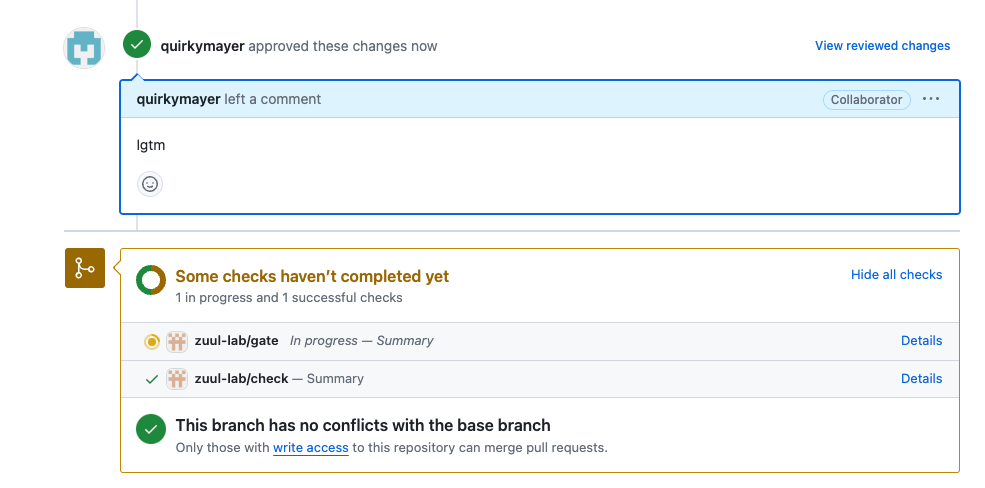
When pull-request is made, it automatically trigger the build. If the build success/fails it also inform on the GitHub pull request check and show the summary.
During the build, as we defined it use Kubernetes provider to run the task.

Here we can see, Zuul will launch the node to run the task inside the Kubernetes cluster. Why I’m using the Kubernetes provider? It way more faster to spawn the worker if we compare using VM.
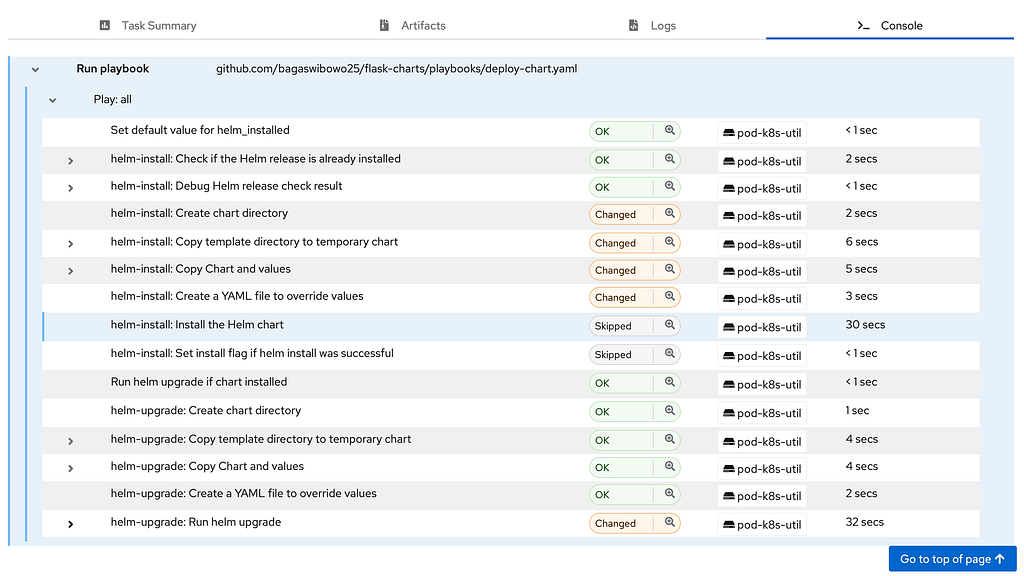
To get more details, Zuul provide build status to inform the detail information during the build process.
We can see the console output for each process, it will make easier to check the task.
Next, after the check pipeline succeeded, to continue to gate process. Need to give approval. It can be done through giving comment or approval on the pull-request page.
It is configurable to customize how the build trigger or approval process.
It automatically trigger the gate pipeline, in this case the gate pipeline will deploy the helm-chart that has been defined before.
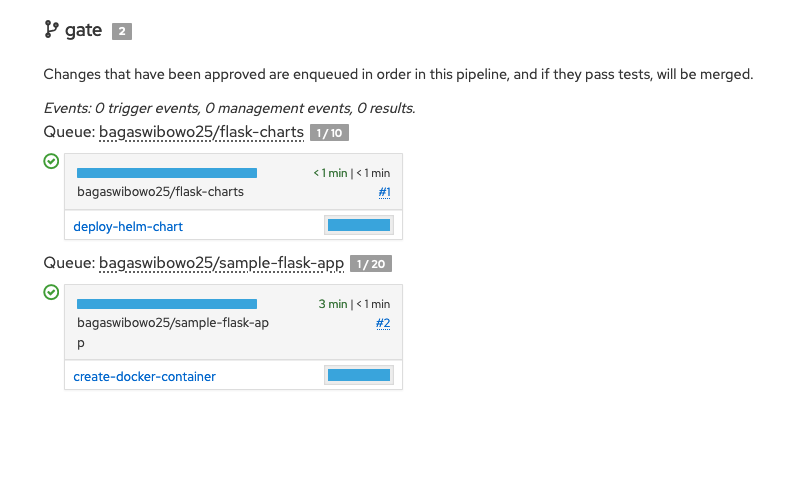
And the process is done, your application is has been deployed on Kubernetes cluster if the build succeeded.
Key Takeaways
Based on this case, Zuul can help you to manage your CI/CD and it has powerful capabilities to integrate with your repositories and infrastructure.
And it very suitable if you looking for project gating system, so it will ensures that only changes that pass all tests are merged, and maintaining the integrity of the project.
But if you require to manually trigger job, like triggering specific branch or commit, it will be quite tricky. Zuul was good on event based trigger job.
Zuul have simple and clean UI, no complex settings. It will helps you to monitor each pipeline and build more clear. For example, when I have failure build, Zuul record every Ansible task.
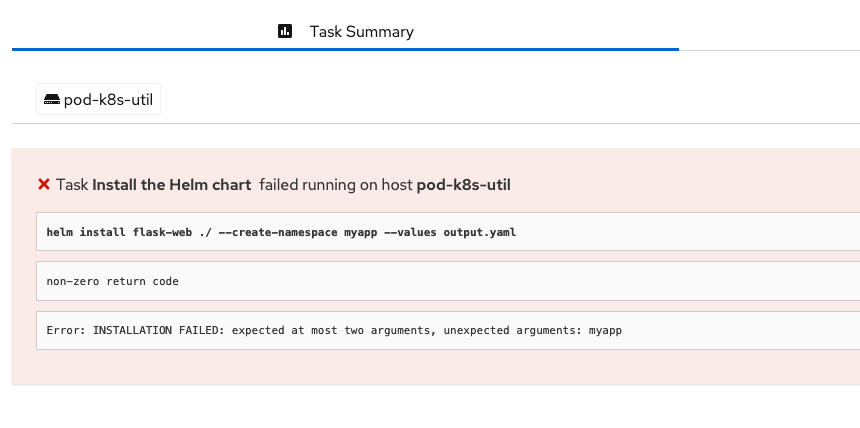
So it make more easier to point out the issues by looking the task summary. No need to scroll the long unnecessary information.
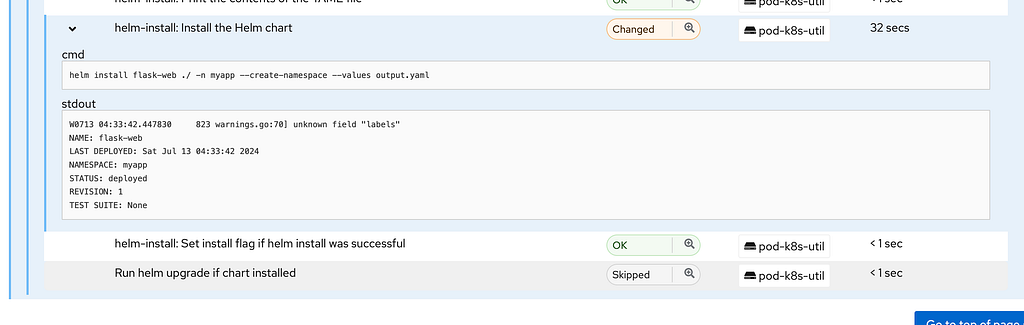
If you need more detail, you can look at the Console status, it describe every task that run on your playbook.
At also possible to you to get the raw log, if you need to export that like to be processed back into the logging component that you have.
So thats all the things that I can share about my exploration on Zuul CI. Thanks for reading, hope it will help you to take advantage on this post.
If there any question or feedbacks drop in comment below.
Happy Learning! 👋